26 October, 2012

Unior 1643/4 (Chain checker for professional use) review

For those who didn't yet figure out, I'm quite a big bicycle addict. Even so, it took me about 3 years before I thought of a technical exam of my good old Univega Alpina SL-3. Things didn't look so good and I had to change the cassette and the chain due to excessive wear on both of them. 3 years for one chain and cassette is quite something considering the amount and type of riding I do.
All this was last summer. This year had some problems with the brakes which turned 4 years without any service so I thought going to a bike center to change the oil. To my surprise I found out that my "new" chain was all trash once more to the point that the cassette needed to be changed also.
Not happy news considering the costs. Conclusion: a chain checker device would have been nice to have to keep a close eye on chain wear and save my cassette at least.

After long searches on the net found there are actually three types of devices for this purpose:
#1 the simplest, cheapest things to get are go/no go gauges that indicate whether or not the chain needs replacement. At best these gizmos have a 2 level test for wear. Being the geek type that I am of course this wouldn't suffice.
BBB Chain Checker

#2 measuring tools that actually tell you something more about that wear and give more power to the user for monitoring how things progress in time.
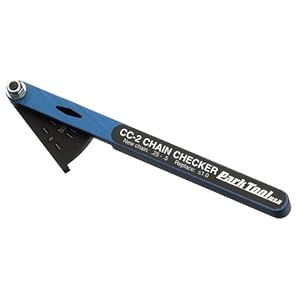
Park Tool Chain Checker - CC-2

#3 the really geek stuff, measuring tools like #2 but electronic ones this time, with digital displays and all the rest. No need to mention these are the most expensive solution
KMC Digital Chain Checker

There's quite a lot of material to read on the subject and I won't duplicate it here. For those into the subject you should start with the good old wiki for the basic stuff: en.wikipedia.org/wiki/Bicycle_chain, Mr. Sheldon for some more in-depth: sheldonbrown.com/chains.html, and google.com for any other questions. Another must read material is found here and talks about more subtle things like wear types and measurement errors.

Getting back to the tool in focus, here we have the Unior 1643/4 which is a chain checker of #2 type. The operating principle is quite straight forward: a metal piece with two vertical pins at both ends, one fixed, one mobile through an off center placement on a labeled rotating disk. The markings on the label are the actual estimated chain wear, between 0 to 1.2 mm or percentage. These markings should be taken with a grain of salt though as a new chain won't read 0 but more likely somewhere around 0.3mm so for accurate readings and decisions a measurement should be taken with every new chain installed. The theory states that a chain is considered worn out and in immediate need of replacement at 1mm stretch across it's whole length. Off course a good practice rule would be to change the chain a little earlier in order to avoid extra wear on the cassette and any unwanted accidents caused by chain slips or breaks.


The package in which it comes is made of cardboard, with not much interesting info on it.


Inside you find the tool wrapped nicely in protective foam. This foam is good to keep for storage keeping as it protects the pins from accidental bending but I found the box to be more conveniently replaced with a zip bag.


Can't think of what more there is to be said about such a simple and straight forward tool. All else I could think of was to actually test that claimed weight on the package which states 168g for the tool while I only got 165g for the tool, foam and package.

19 October, 2012

Sneak peak into Canon 60D

This summer unfortunately was marked by a few accidents among my friends including my girlfriend that fell from the bike while we were riding together.
Long story short, she had her DSLR dangling around her neck when it happened. Results? She got a broken arm, the camera lost it's battery compartment, back panel buttons functionality and overall scratches and dents, the lens got a broken filter and a scratched front element, luckily it was just the good old 18-55 kit lens.
After she got back on her feet it was time for the camera to be fixed so we went to Canon's only camera service in Romania. We weren't expecting to be a complicated matter as I suspected that during the fall a cable must have come loose or brake. Imagine our surprise when the guys from the service asked for 1/3 of the price of a new 60D for the repair with little further comment on why so expensive.
I had doubts on the price so we took back the camera, not before paying a nice beefy 25 something dollars just for looking at the camera.
After I had the go ahead I seized the poor camera and got her to pieces to see if anything can be done on the cheap.


Canon EOS 60D DSLR camera
Trying to remove back panel
In the end it turned out it's easier to take off the back panel and I unscrewed more than it was needed. Inside my assumptions turned right as the back panel film cable connector was torn out of the PCB. It's not a pretty site looking at a tiny millimeter wide connector with terminals thinner than human hair and thinking about a re-soldering job. About half of the tracks were ripped from the PCB with no chance of repair but I took a shot for the other half at least.


Canon EOS 60D DSLR, back panel removed
Half job done: panel removed
I had access to the latest greatest Weller soldering station with a thin enough tip, used a microscope for vision and took some two hours worth of work trying to suture the wound. First time I almost gave myself a heart attack thinking I messed something up as the camera wouldn't boot anymore but it turns out it has some kind of protection that keeps it dead as long as the back panel is removed and not in it's place. Didn't see any switches of other clear evidence of how this protection was implemented though.

At times I succeeded gaining back 3 buttons and the activity LED but it was still not enough for any real good use. And as I tried and I tried I lost some of them and ended up with only two buttons, Live View and  right arrow from the navigation controller. At least now I know why the guys from the service asked for nearly 250$, they wanted to replace the whole main-board as it's impossible to fix it anyway else.


Canon EOS 60D DSLR, ripped off connector
Other half impossible to do 


Another Petzl Myo XP repair

As I've said before, my Myo XP was a ticking bomb waiting to blow after the last repair. Just like my NiteRider I was in a mountain trip when it failed.

I knew it from the start that it was the cable connecting the battery compartment to the light head. I twisted it around a little and got some mixed results but in the end it died completely. Back in the office turned on the lamp, grabbed my tools and got to some serious tearing apart. The light head wasn't anything new but it was a first timer for the battery compartment. I was surprised to find in there a fuse that was actually blown out from my screwing around back on the mountain.

A fuse can be seen at the left end of the red wire

Didn't bother to dig into the problem that much and just took off the old cable. Unfortunately it's not an easy kind of cable to find so I had to improvise and use an electrical outlet cord. I could have found thinner alternatives but I wanted a decent cross section for low voltage drops and increased stiffness. It's left to see how well the new cable will hold up with low temperates and mountaineering abuse.
This is what came of it:
Final "masterpiece" after cable replacement